
Now we get to the crux of building your own DIY 2-pin tele binding — the cable system. Being satisfied with the downhill performance of a tele tech binding is determined by:
- Position of the cable pivot (distance behind 2-pin line)
- Connection to the boot (real heel or 2nd heel)
- Springs used (stiffness and travel distance)
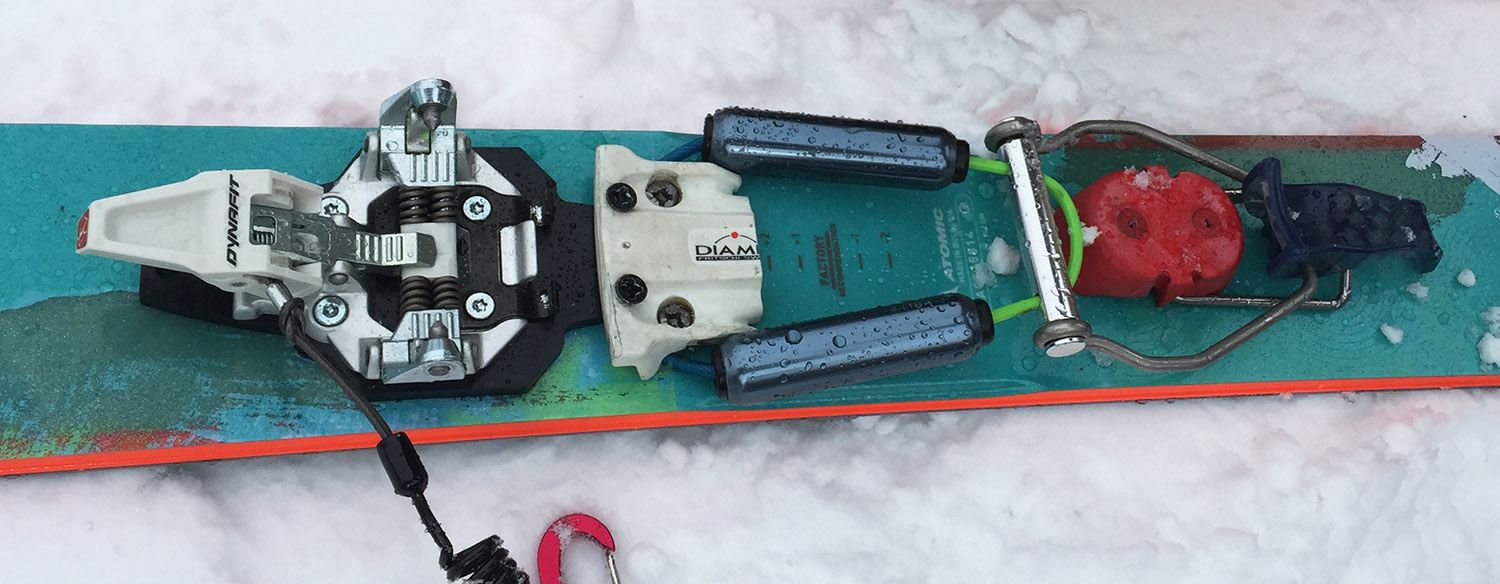
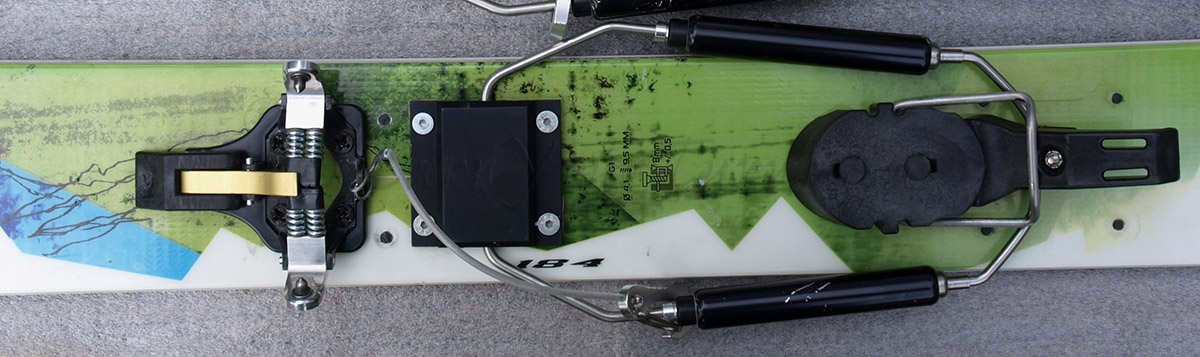
Mixing it up a bit. 2-pins by Dynafit, cable block by Fritschi, BD cable assembly, G3 heel post.
Real or 2nd Heel?
The main difference between hooking a spring-loaded cable to the second heel (the duckbutt) or the real heel is the amount of tip pressure it creates. Connections at the duckbutt deliver a smoother engagement that has fast initiation, but does not over drive the shovel of a ski. By comparison, cables attached at the real heel deliver tip pressure in spades, enough that you will need to set your stance back so you don’t submarine in powder. While this sounds like it might compromise your tele style, adapting to this insures you will weight your rear foot sooner and, in time, more confidently. I’ll even go so far as to say that if you can make this adaption your tele turns will improve. Results will vary.
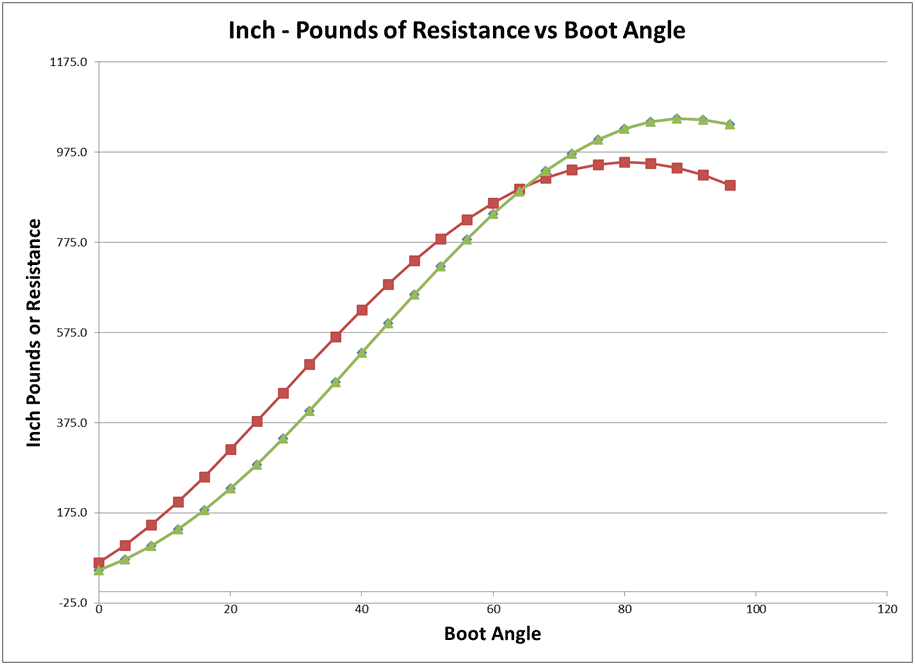
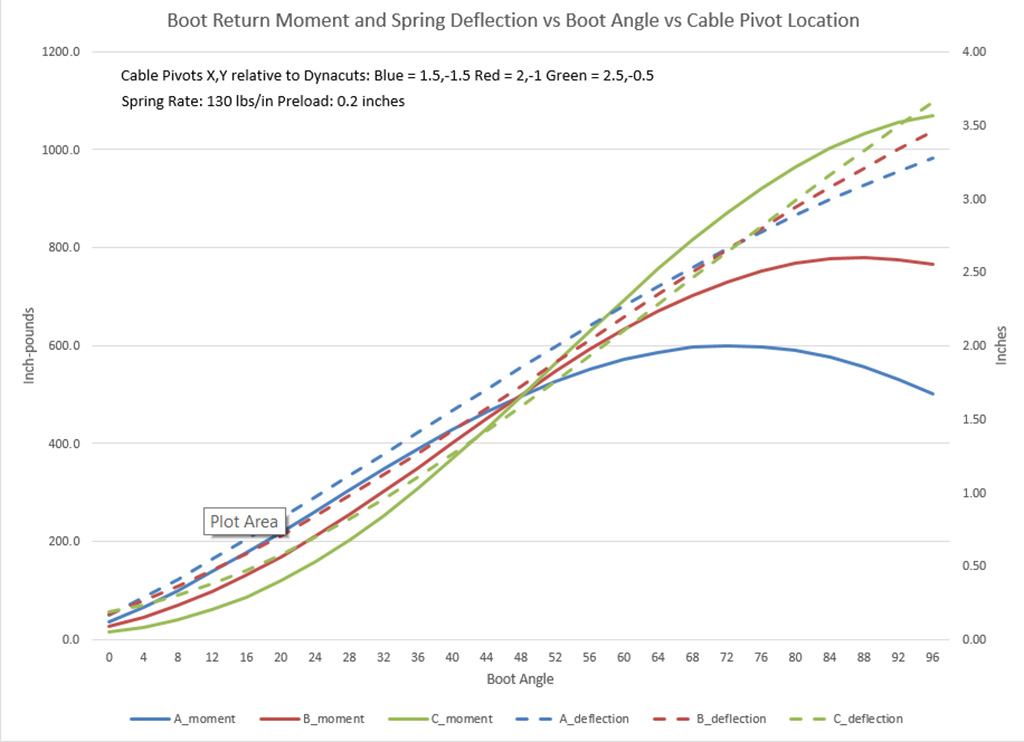
Comparing flex resistance to cable angle: Real heel (grn), 2nd heel (red).
Graph courtesy Jason Quintana © 2016
If you opt for a 2nd heel connection the only reason to DIY is if you’re seeking perfection, are impatient, and have access to tools few do. Without CAD software and a 3-D printer the binding you’ve been waiting for is still future. There is hope to temper your impatience; the future is not too far away. If you’re willing to compromise on perfection and simply cannot wait, Meidjo, Lynx, or Outlaw may satisfy your cravings.
The main reason to go with a real heel connection is the simplicity of the binding. All the necessary hardware already exists, it is just a matter of picking the components and putting them together in the “right” configuration.
Ever since Russell Rainey introduced the Hammerhead the ability to adjust the cable pivot location has been seen as a benefit. Not necessarily so you can change it regularly, but so you can figure out what position you like the best for the majority of conditions. In general, the farther back the pivot location, the more active, or powerful the binding feels making turns. Conversely, the farther forward, the smaller the vertical component of the cable tension, the main contribution to perceived ‘activity,’ and the more neutral the tele sensation.
Off the shelf configurations
There are currently four commercially available kits for making a tele tech binding, B & D, Kreuzspitze, Moonlight Mountain Gear, and Olympus Mountain Gear.
B & D
B&D’s 2-pin tele kit is super simple.
Kreuzspitze
Another easy kit to install is the Kreuzspitz Telemark plate. This is a machined aluminum plate that uses the Enzo pattern – a classic 4-hole Targa pattern plus two more holes in between the ends — to mount to the ski. Get a Targa/Voile 4-hole jig for the corners and match drill the middle holes.
On the front half the plate has threaded holes for any 2-pin toe with either a Dynafit 5-hole legacy or Radical 4-hole pattern. On the back half is a steel plate covering three slots for an axle that you can attach Kreuzspitz or Voile Switchback/Hardwire cables to. Those slots correspond to cable pivot positions at 47, 59.7, and 72.4 mm behind pin line. On the Hammerhead activity scale they are approximately HH#2½, HH#3½, HH#4½ with standard springs, less with soft springs, more with stiffys.
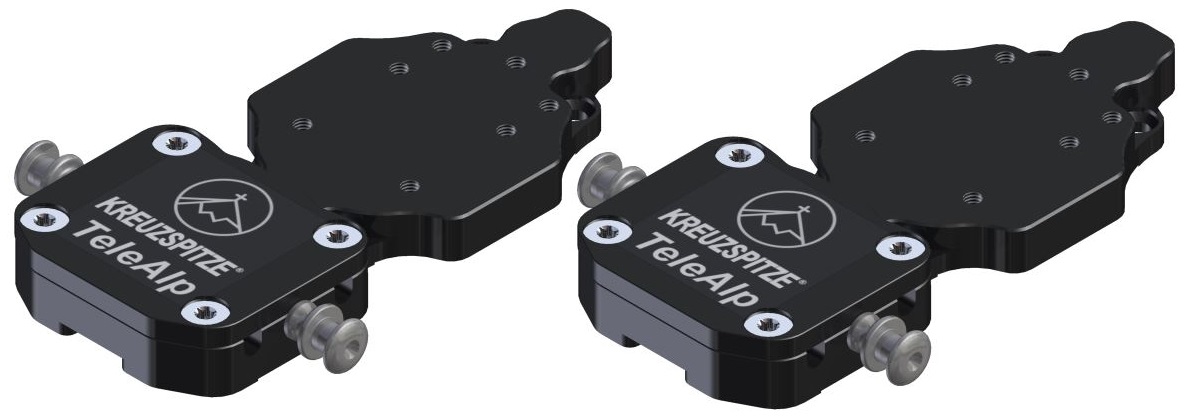
Kreuzspitze plate is the epitome of a KISS design.
As with the B&D plate, the cables can be removed to reduce drag weight in the skin track. Early adopter dschane pointed out that connecting the cable rods with the hooks upside down makes them less likely to fall off, except, perhaps, when shouldering skis.
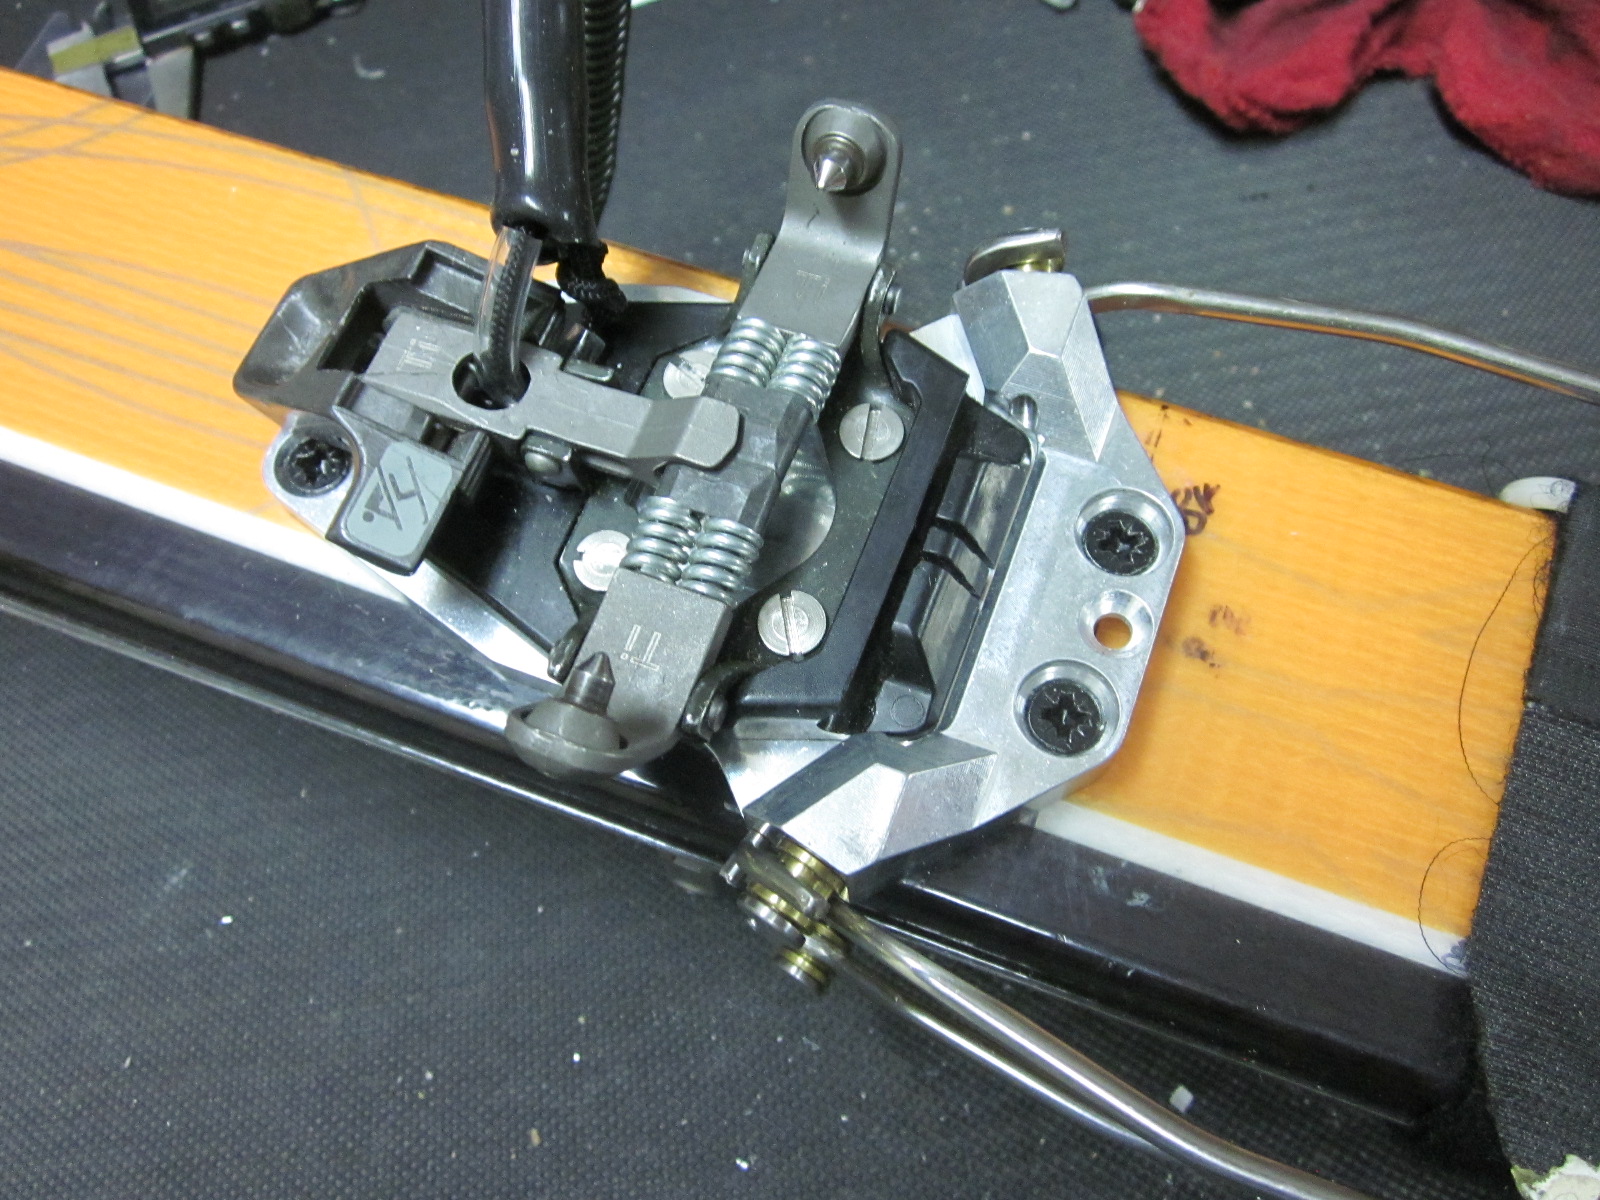
Olympus Mountain Gear TTS Cable Kit
With OMG you’ll need more installation prowess; at the least you’ll be drilling more holes and may even be installing inserts. My advice is to borrow a Dynafit jig for the toe then make a jig or get a Jig-a-rex with a TTS template for the cable block. If you’re an old hand at this you should be adept with a paper template, masking tape, and the Carpenter’s Rule. Just be very, wary, careful; those boards cost a pretty penny.
OMG cable block mounted with inserts and machine screws.
(The extra holes are from a previous binding)
The beauty of the OMG kit is you have the freedom to experiment with cable locations other than the two recommended macro positions. The forward block position yields pivots at 45.1, 57.8, 70.5 mm (~HH#2½, HH#3½, HH#4½) and the rear position has pivots at 57.8, 70.5, 83.2 mm (HH#3½, HH#4½, HH#5½). The activity ratings are with standard springs, so less active with soft springs, more active with stiffys.
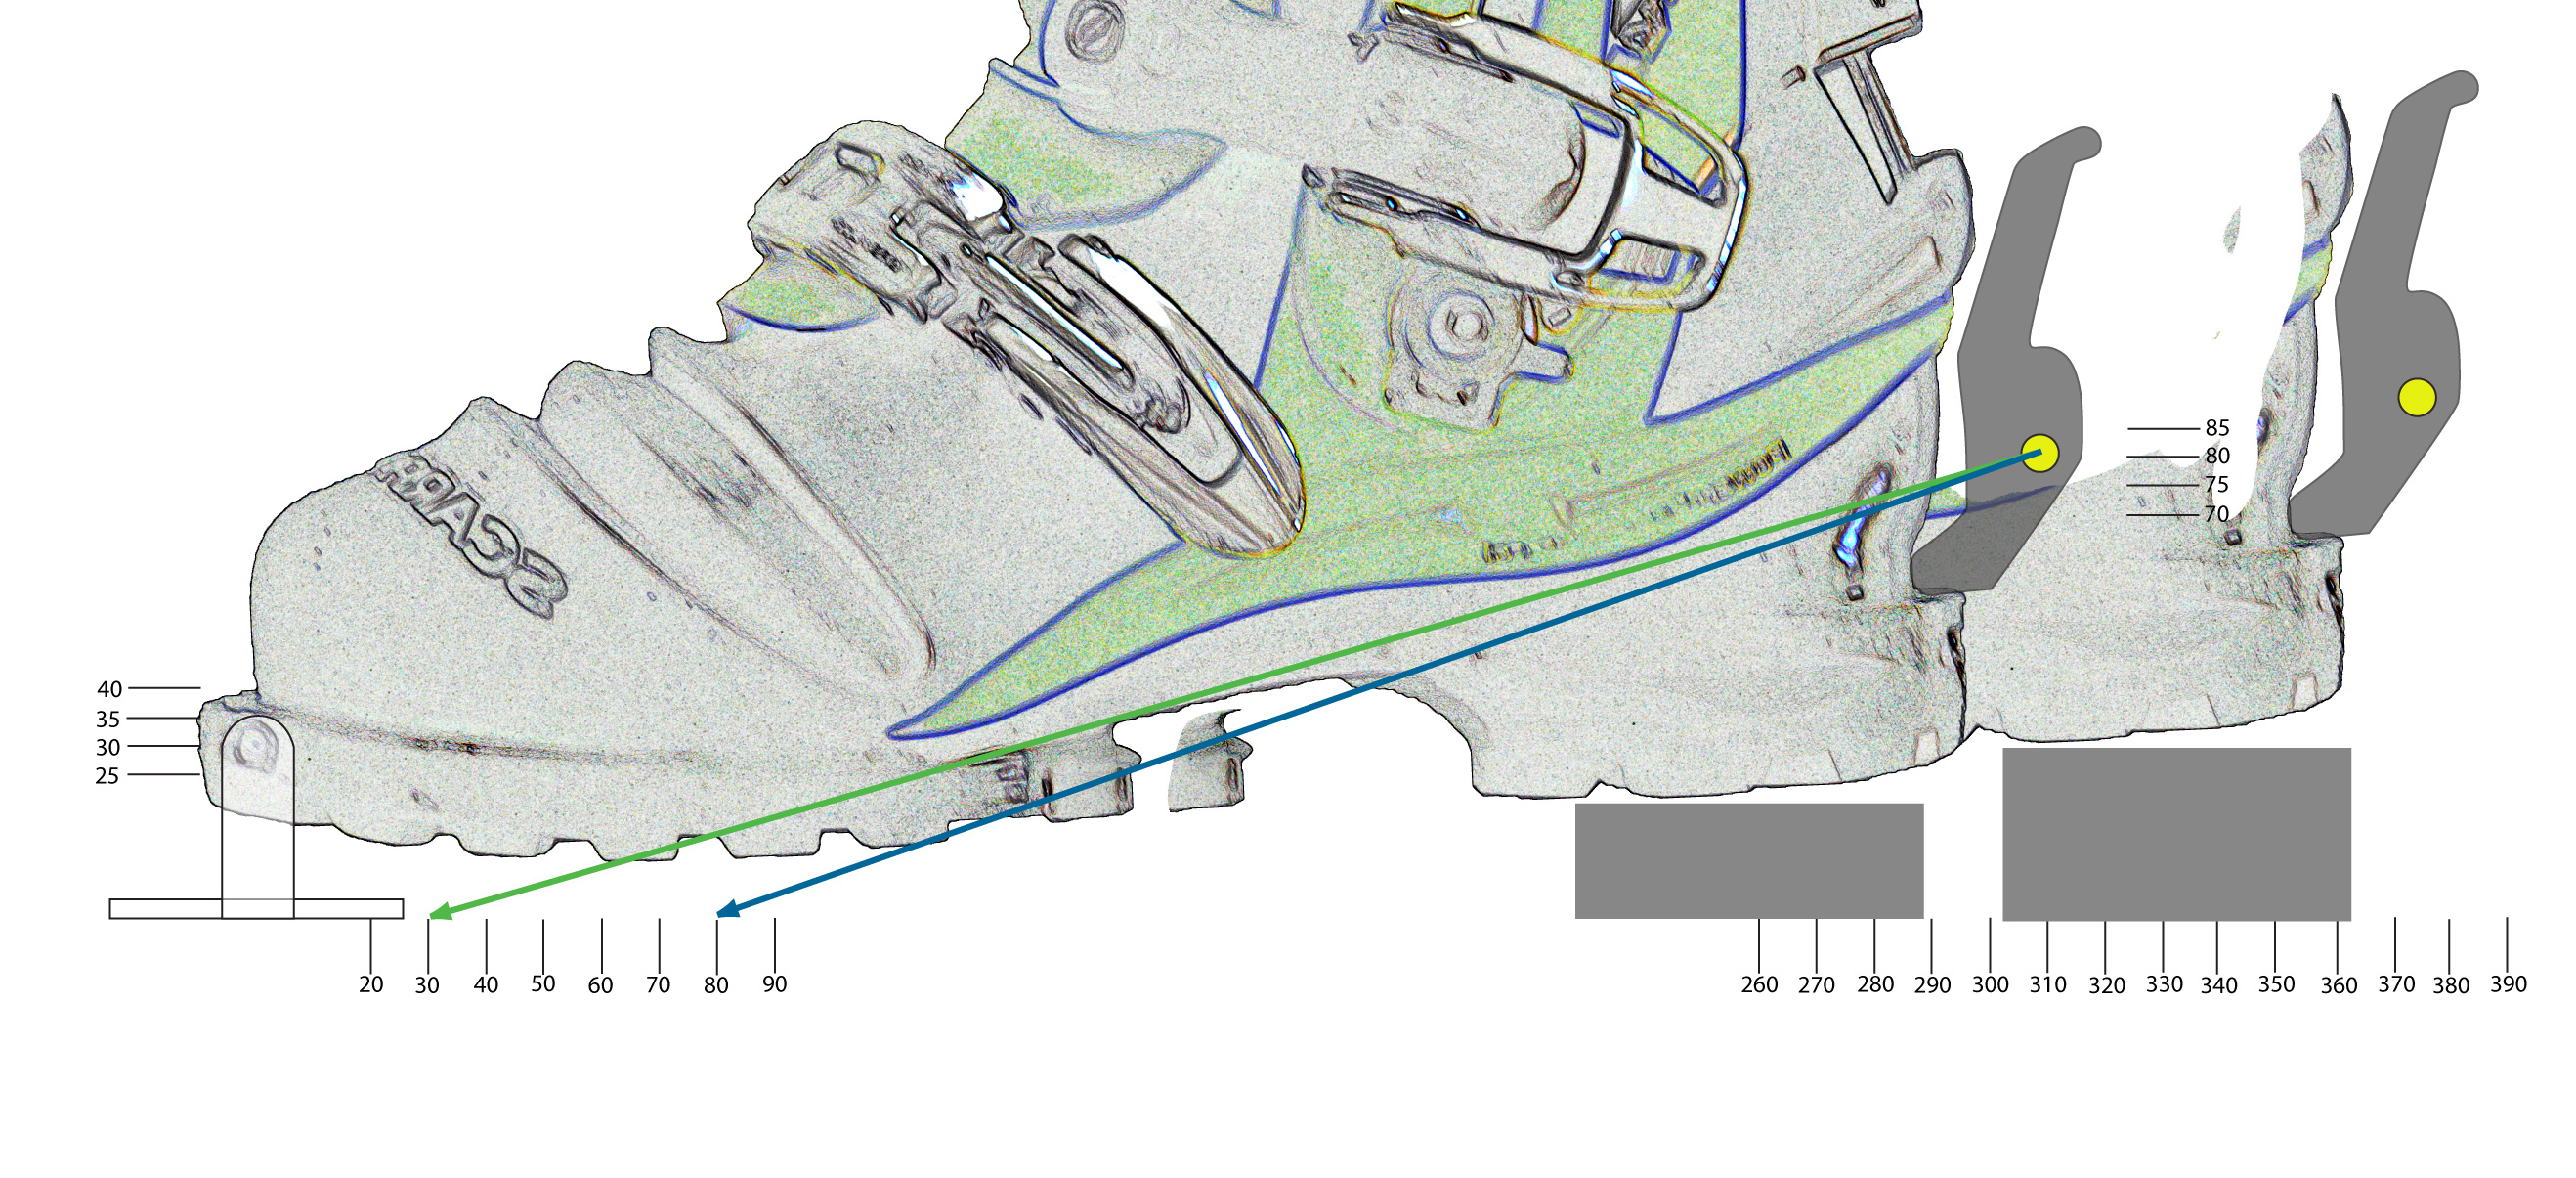
Side view of a Scarpa TX-Pro (’08) size 26.5 with 2-pins 30mm above the ski and a 20mm heel post. Sz Lg 2nd heel position indicated along with a size 29 heel located on a 30mm heel post. YMMV.
In my experience the half-inch (12.7mm) spacing of the three cable slots is probably adequate because you definitely notice the difference between each position. However, half that spacing again (¼”, 6.3mm) would be nice for fine tuning.
Until someone comes out with a cable system with smaller adjustment increments you will need to create it yourself, or be willing to experiment with different block positions. The problem is shifting the block only ¼” requires a new test block position and/or a spare pair of skis. As a general rule hole perimeters must be at least 5mm apart to maintain holding strength and more space between is better.
Proving the pivot point
Looking at what Kreuzspitz offers, OMG recommends, and Meidjo has defined, the 60mm position looks rather popular. Despite variance in the depth beneath the plane of the pin for each of these, the distance behind is too similar to ignore and begs to be a benchmark for comparison
In my own experience, 60mm is great for a 2nd heel connection, but a bit too active for a real heel connection, and yet, 47mm is too soft, implying that the 50-55mm zone is a good bet (hence my call for ¼”/6.3mm slot spacing). My boot size is 26.0 and as the graphic above makes clear, larger sizes can expect to shift back although not necessarily linear. In other words, a boot 20mm longer doesn’t mean the pivot should shift back 20mm. That’s why you need to experiment a bit.
Not only does distance behind the pins matter, so does vertical depth.
Graph courtesy Jason Quintana © 2016
The common solution to custom positioning is to mount one binding to a two-by-four and experiment on the carpet with various block locations and slot positions. The main problem with carpet testing is the tele-resistance you feel in a static tele is not the same as what you would feel sliding on snow.
To calibrate what you’re feeling on the carpet compare with a known tele rig side by side. If you can, take it to the slopes on an old pair of rock skis to confirm your suspicions. It will take extra time, but should save you from compromising your brand new boards with extraneous holes.
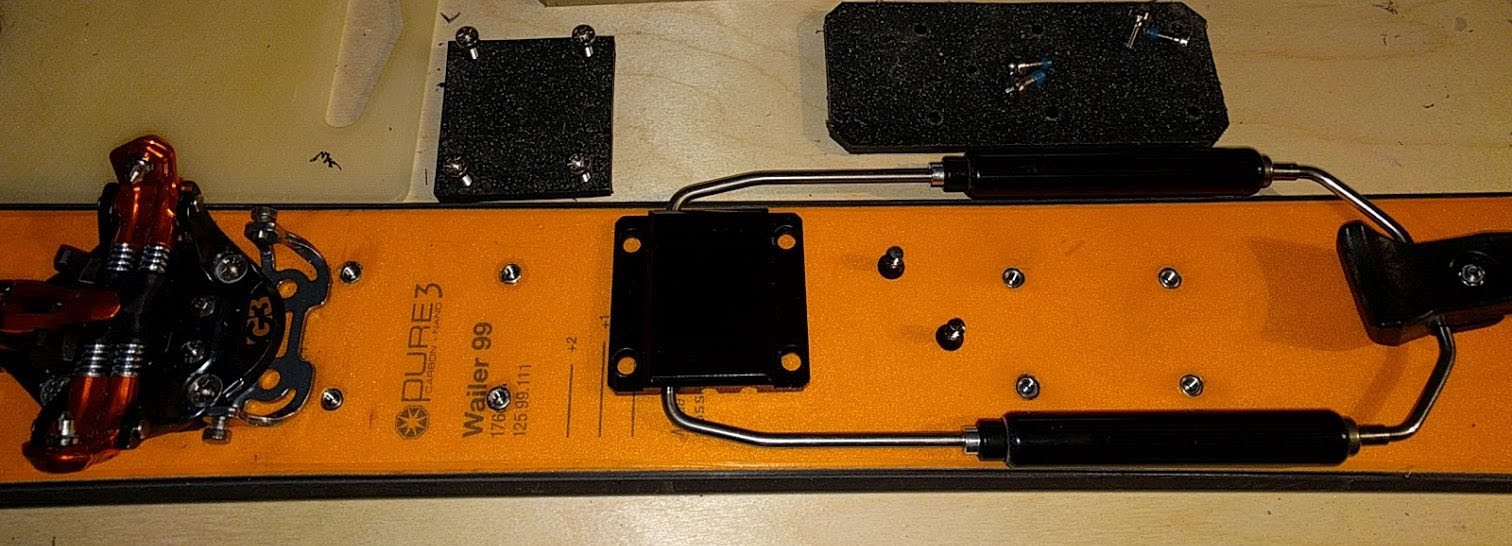
JNicol’s DIY TTS: G3 Ion toe, OMG cable system w/shims, 22D Hammerheel.
As ever, I recommend inserts for the OMG cable block. They let you adjust the position without compromising holding power of the threads and they increase retention strength.
rjmh added inserts.
Cable/Boot sizing
Another complication to finding the sweet spot revolves around the options available for cable rods and springs. The larger the boot the longer the cable assembly needs to be. Depending on the length spring used and the position desired you may find that you need to switch between short or long U-shaped cable rods with OMG, or long versus short cable rods from Voile. As will be detailed in the next episode of the DIY 2-pin chronicles, except for large boots (>28.5) the short rods should work for most boots.
Before you start drilling there remain two more ingredients to look at: the heel throw and the springs used, plus some recommendations on shimming. And a final note — if all this seems like too much work it probably is. The “normal” positions are probably good enough. At the least you’ll want to move the cable into the positions available and go with the best compromise. Save the tinkering to the pros and wait for the next “upgrade.”
Related Posts
DIY 2-pin Tele Chronicles: State of the Art
DIY 2-pin Tele Chronicles: Picking your toes
Tele-tech Chronicles: Use the Force Luke
Ed. Note: Thus far in this series of articles dubbed the Telemark Tech Chronicles I’ve relied on 30 years of experience skiing every imaginable telemark binding put beneath my feet to set the stage for advising you in how and why you may want to join ranks on the bleeding edge of the tele tech revolution. In case you missed it, the why is to have Dynafit caliber touring efficiency with Hammerhead adjustability, power and control. In this part I’m indebted to the many folks who have shared their experiences building their variations on the 2-pin tele theme and flushing out performance limits. They deserve a moment in the limelight, including: dschane, jnicol, jasonq, cesare, rjmh, Allan Fici, Kenji, et cetera.
© 2017
8 pings
Skip to comment form
[…] DIY 2-pin tele: Fixing the Cable position […]