
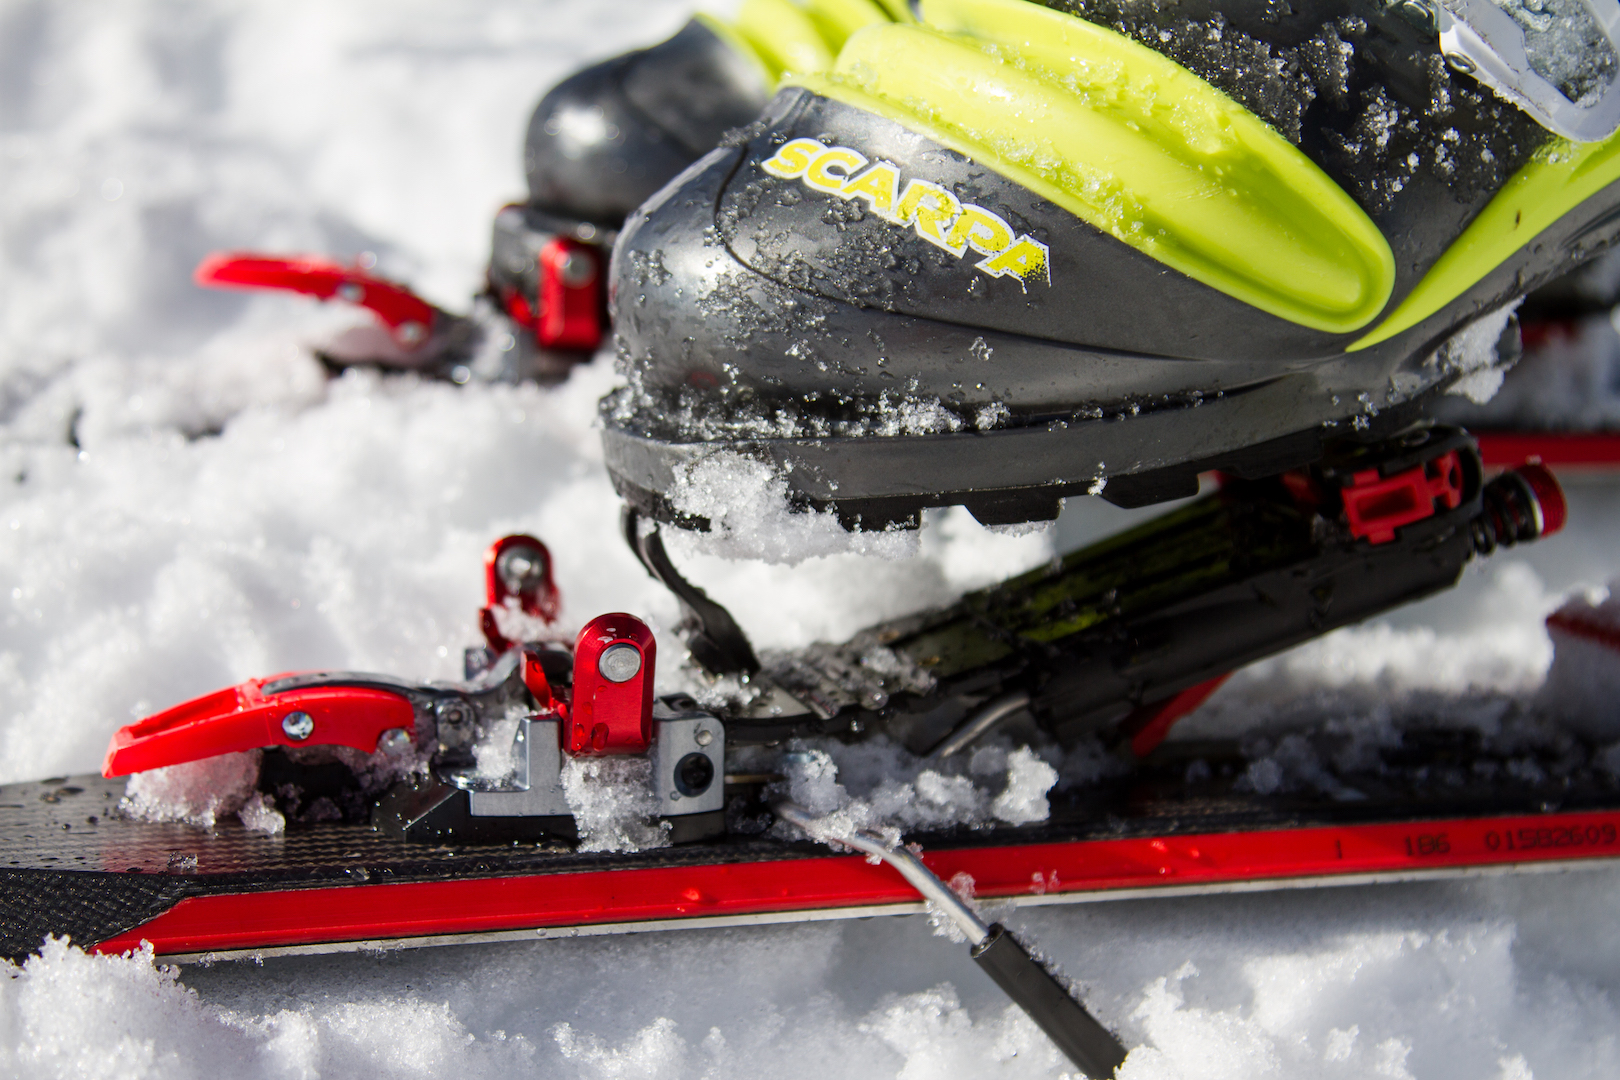
Meidjo 2.0, a 2-pin telemark binding with NTN technology.
After one full season of use, the telemark binding that has tongues wagging is coming to market with semi-major changes to its design, but no major changes to the root functionality. To those who missed it, Meidjo is the first binding to use a low-tech toe with an NTN hook to hold your tele boot tight.
Meidjo allows AT touring efficiency with a two-pin tech toe, and the trademark edge control of NTN. In addition to this powerful one-two uphill/downhill blend of performance, it has an adjustable, albiet non-certified, safety release and weighs a pound plus (500 g) per binding.
Recapping Issues
All the performance was inherent in the first version of the binding, but some of the materials used in the toe were a compromise in the rush to finish the design. The pins the springs wind around could bend, causing a boot to release even when locked out for touring, and the toe pins were held in place with C-rings allowing the potential for them to fall out. There were a host of other niggling issues in the spring box that clamps on to the duckbutt of a compatible NTN boot. Within two months of releasing the binding, Pierre Mouyade, the brains behind Meidjo, revised the plastic spring box, fixed a heel post that was prone to collapsing, and might have fixed the pre-release in tour mode if only inserts were more uniform between brands.
2-pin Toe Changes
Recognizing that The M-Equipment would have to accommodate greater variation among insert brands, Pierre was forced to abandon his unique locking switch and revert to a more traditional lock on the toe unit. This is the most obvious change to the version 2.0 Meidjo for Winter 2016.
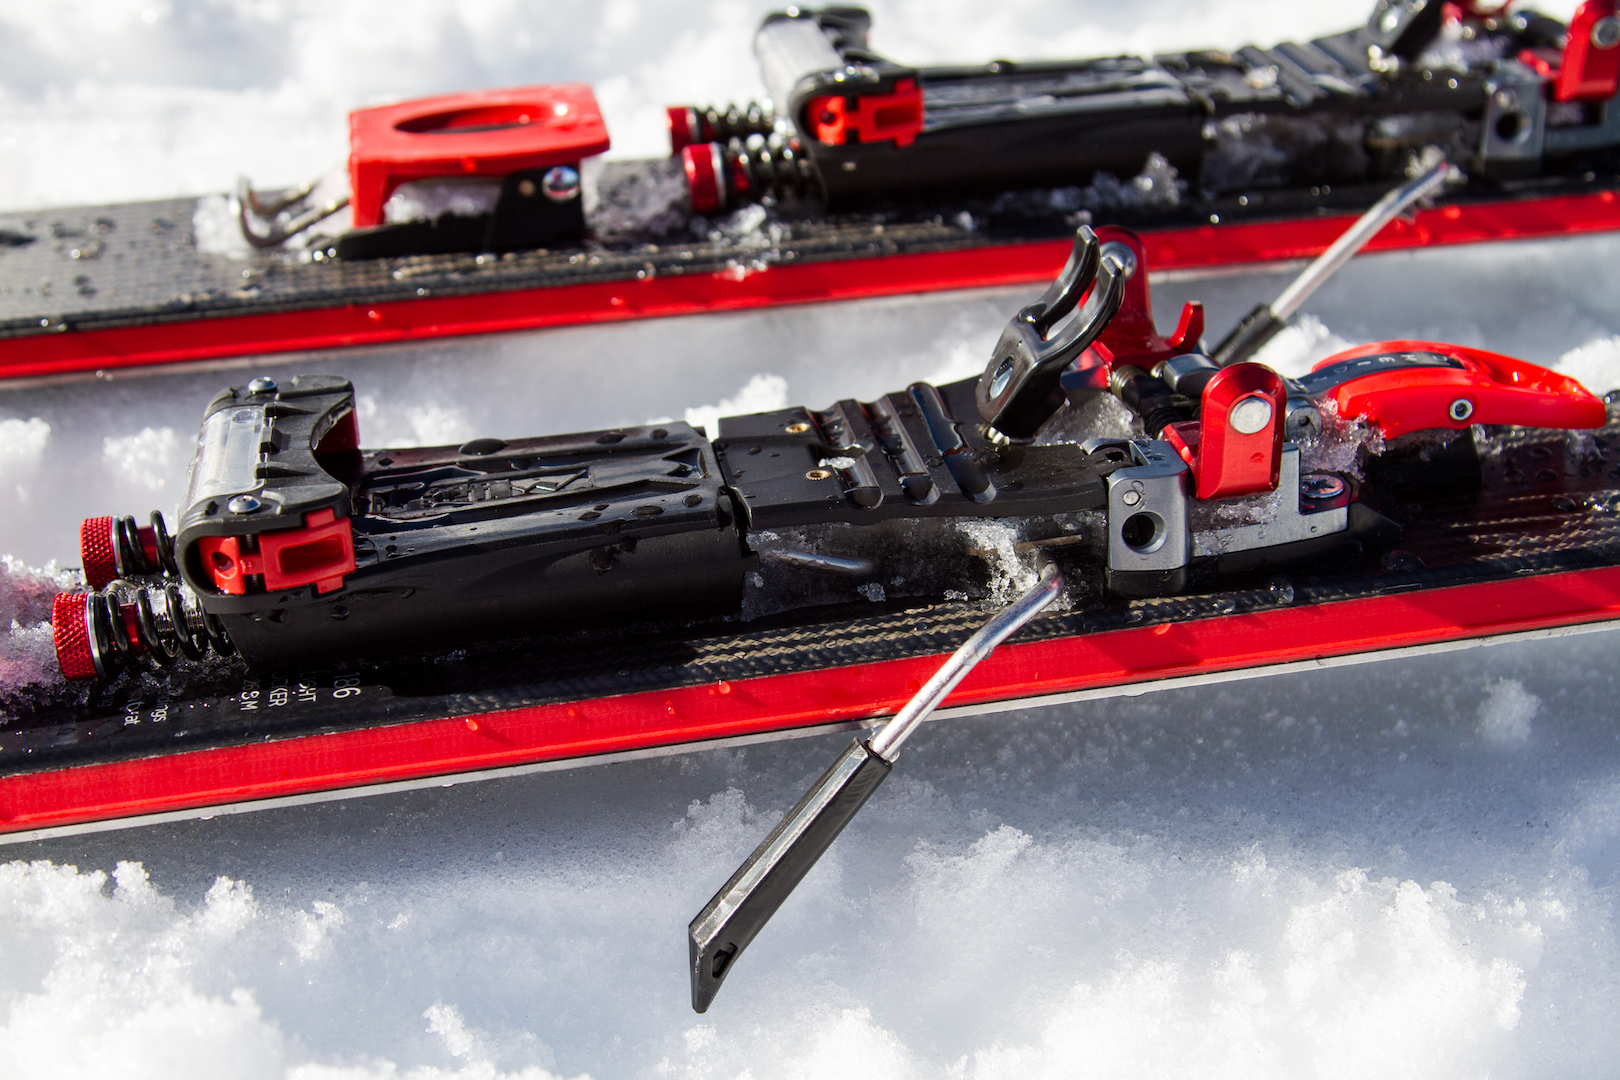
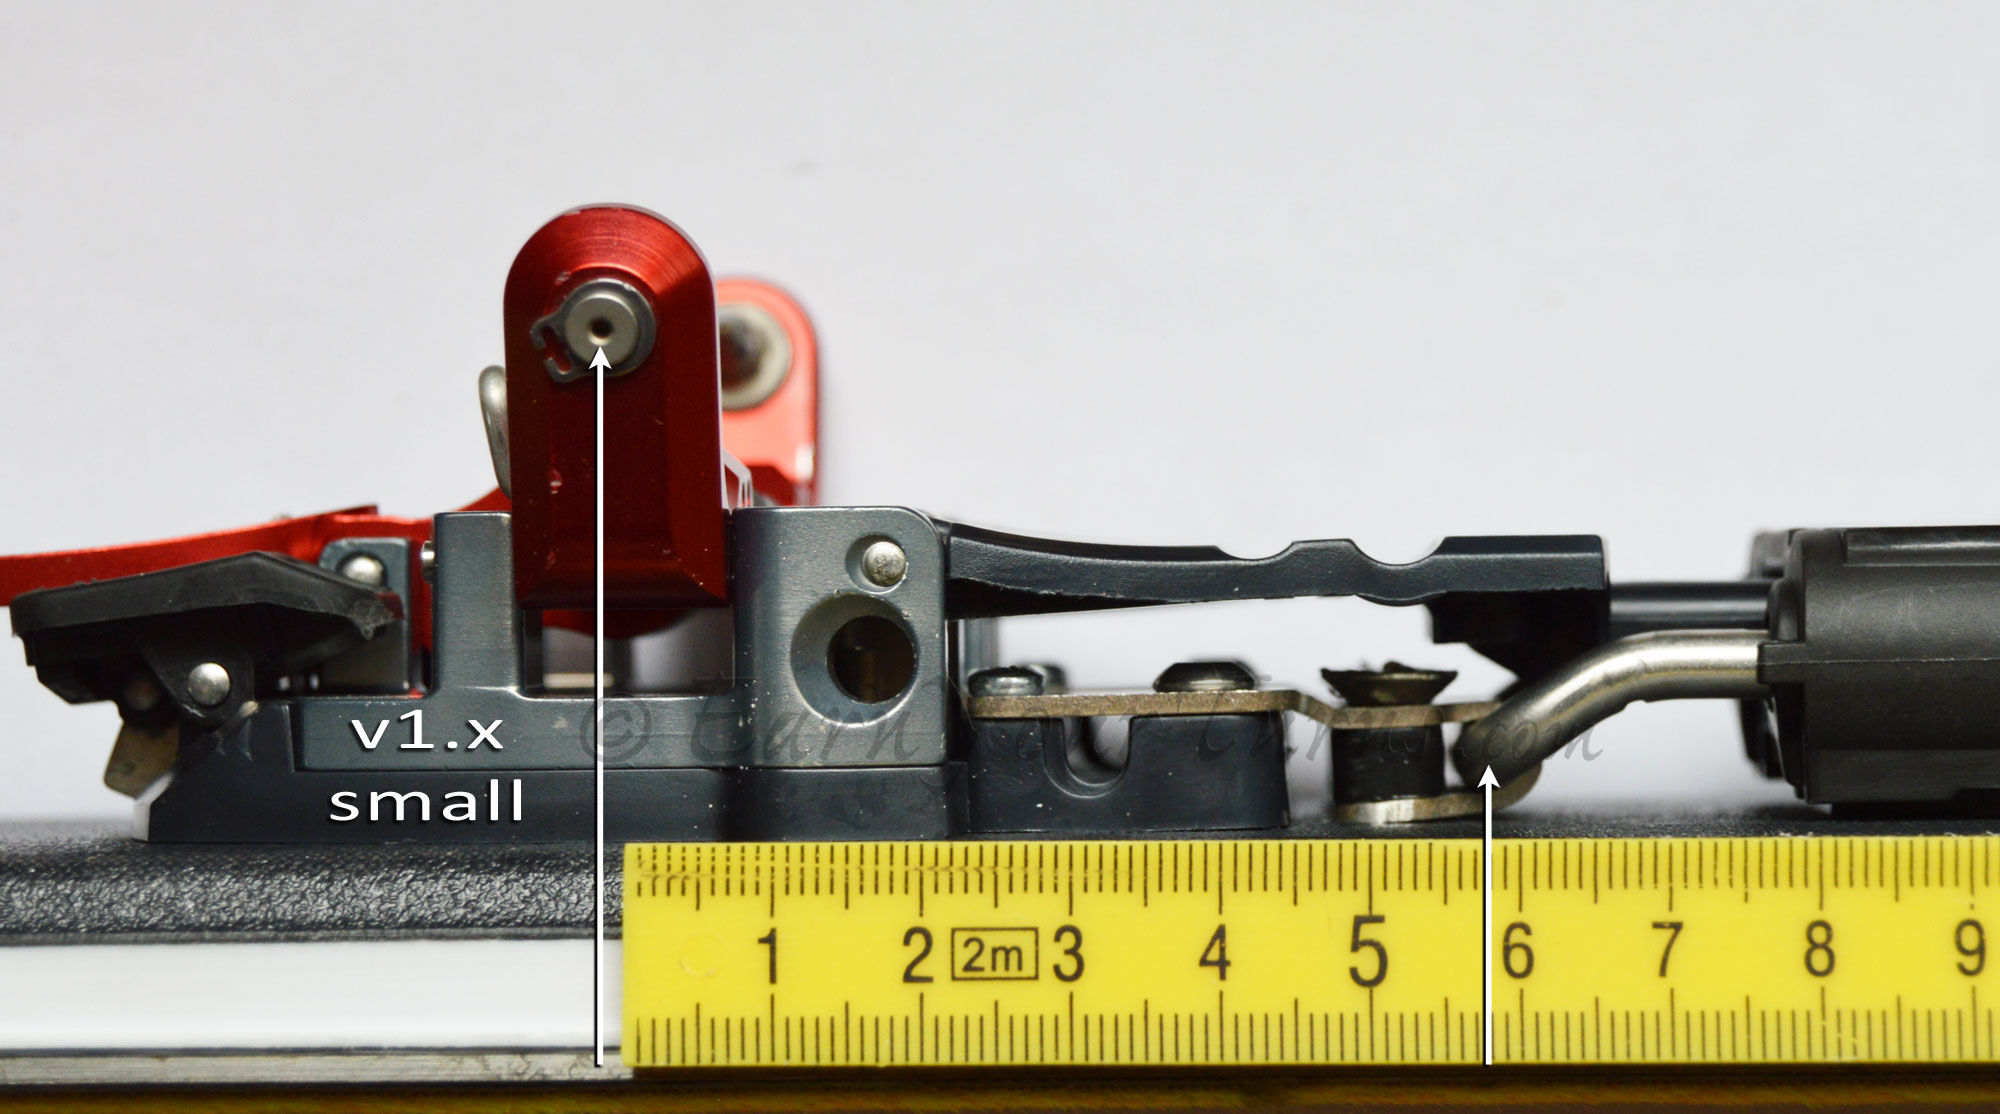
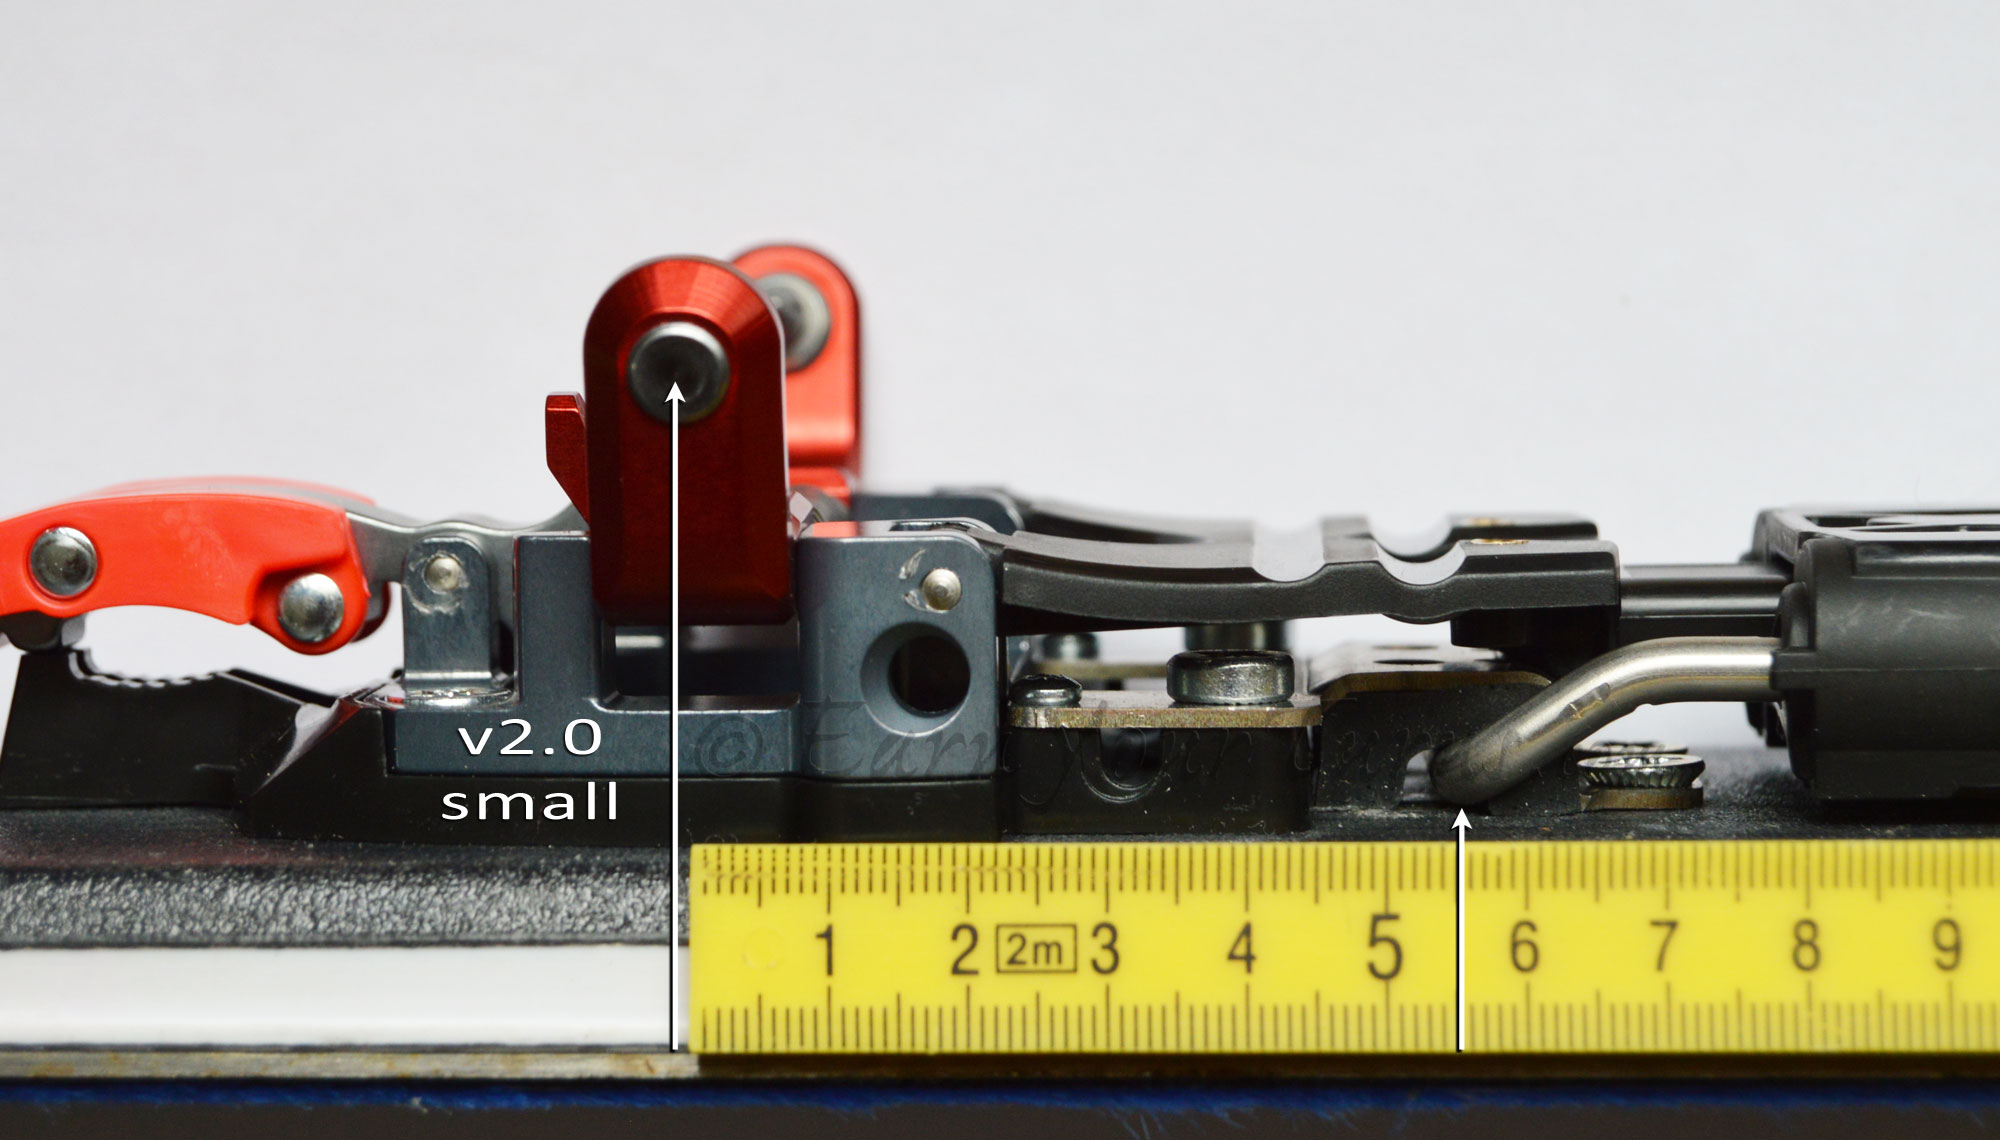
Classic style toe lever for releasing or locking the toes, ice cutting grooves in the pins, now pressed in, and integrated alignment tabs. New mounting holes too, see below.
Besides improving the lock mode for touring, it also eliminates a common problem of having to make sure a flat metal bar was properly installed to make the original locking toggle work. More than once I found myself almost screwing the toe down without adding this critical part. No doubt I wasn’t the only one to make this mistake, so eliminating that potential problem may be reason enough for the change.
There are a number of other, less obvious but nonetheless significant upgrades for this season.
Pins holding the flex plate behind the toe unit are pressed in with tighter dimensions so they won’t work themselves out as a few people noticed.
The toe pins are pressed in the bent aluminum arms so they can’t fall out. We’ve heard that before, or assumed that before. Barring any “Kingpin” issues this should be a non-issue from here on out. This year’s pins will come with two slots cut into the conical section of the pins, to help clear out any ice that might be frozen in boot inserts.
Alignment wire tabs are now from the metal of the toe arms, instead of using bent-wire tabs. This change shouldn’t change how easy the binding is to get in to, except for the addition of ski brakes.
Ski brakes are great for not having to clip on a leash after being able to step-in to this binding with relative ease. Unfortunately the presence of the ski brake probably reduces how easy it is to get in to the Meidjo, potentially by an order of magnitude. Admittedly this is speculation on my part, so I’ll report on that after I get the brakes and do an on snow comparison with v1.2. On most days, the compromise will be worth the convenience of not having to bend over to clip on a leash.
Modified Toe Holes & Spring Position
The mounting holes of the toe unit are changed so that it is the same for small or large sized NTN boots. In ver. 1.1 and 1.2 the large and small toe units had different rear hole locations. For ver. 2.0, different spacers are used to adjust the position of the spring yoke for large or small bindings. If you are upgrading from ver. 1.0 or 1.2 you will need to drill two new holes behind the front four that are spaced as wide as the front two, yielding more surface area for securing the toe to the ski. Two holes furthest aft on v2.0 correspond to the holes of the band-aid fix provided last year to improve retention on the spring yoke. Whether or not those holes align or not will depend on if you had a small binding, or a large. If the large, no worries. If the small, the proximity may require mounting the new version to a different pair of skis.
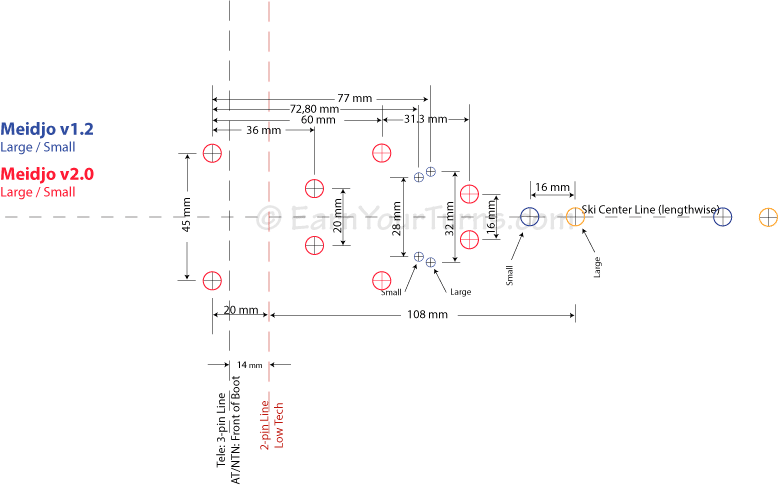
The four forward holes remain unchanged. The four rear are new. Two holes 45mm apart, 40 mm behind pin line replace the original, aft holes that differed if the binding was small or large. The current rear-most holes were part of a band-aid fix for v1.2, but are now permanent for all sizes. (click to enlarge)
For most, this will be your first foray into the world of 2-pin tech, and for some, a switch on the NTN front. In either case, Meidjo v2.0 will be significantly easier to mount than v1.2 although attaching the spring tension nuts is still one of the harder steps in the assembly process.
Many of the corners in the spring box were given a radius to prevent cracking, and many walls were thickened up to make this critical piece tougher throughout. This was done for ver. 1.2, so no need for further revisions to the spring box for v2.0.
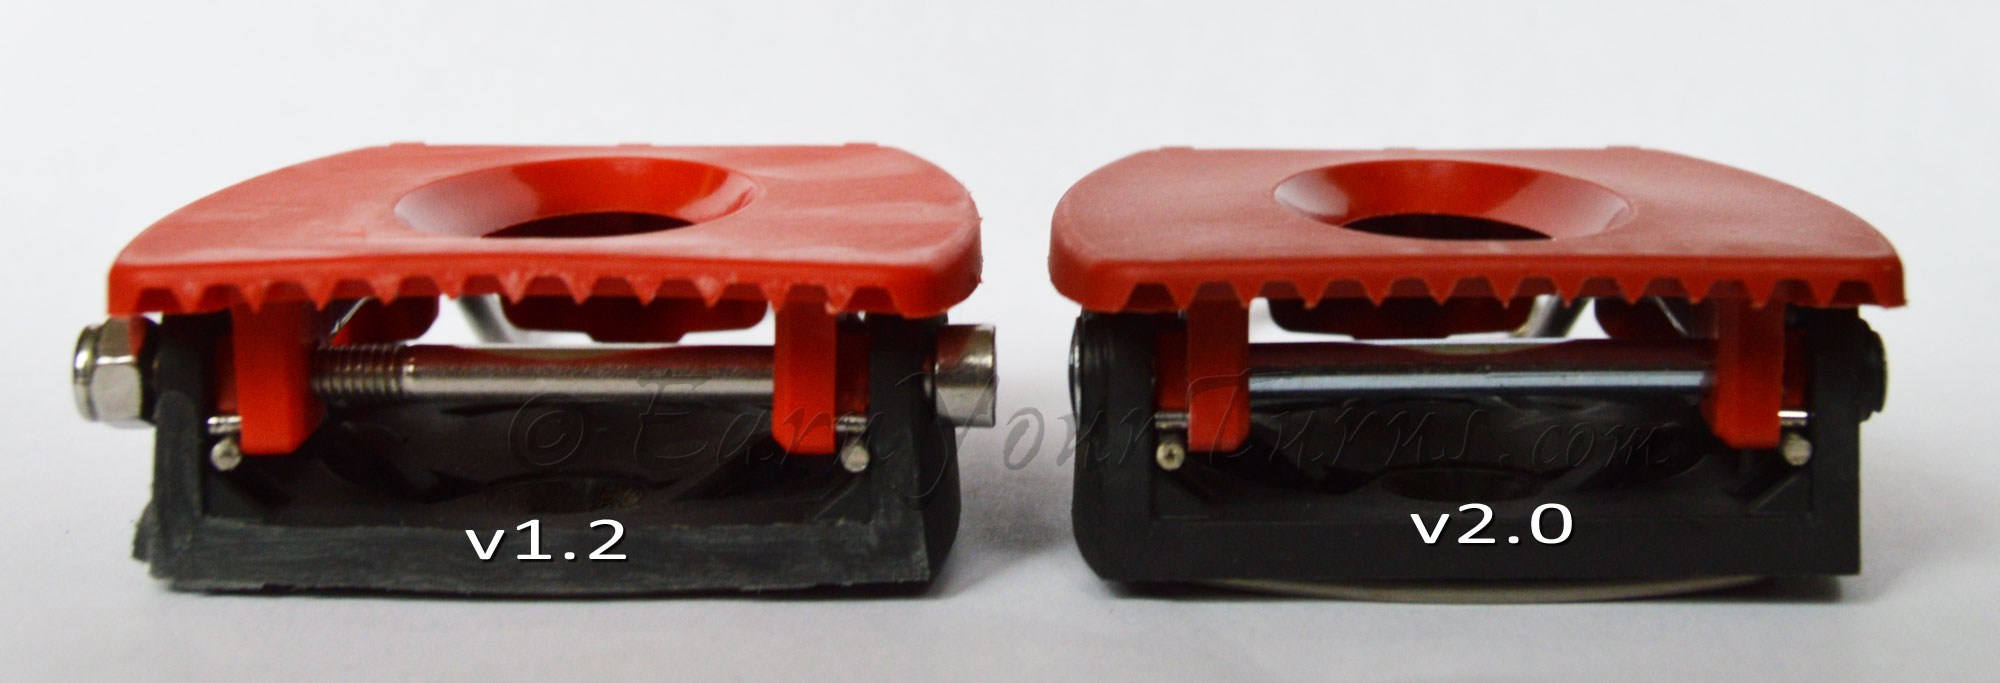
Heel unit of v1.2 compared to v2.0.
On the heel unit, the axle the first level climbing post pivots about is improved. In ver. 1.2 the axle this was a simple bolt with a lock nut. In ver. 2.0 the axle that is riveted in place, saving a few grams and eliminating the possibility of the nut loosening.
Spring Changes
Position of the tele tension vector for v1.x is approx. 60mm behind pin-line.
Position of the tele tension vector for v2.0 is approx. 56mm behind pin-line.
One less than obvious change is the pivot location of the spring yoke, or origin of the tele tension vector, what would be called the cable pivot location in a telemark binding with a cable around the heel. This has been moved forward approximately 4mm in the short version, and the length of the springs increased. The net result is that if you need to, or want to, you can drive your knee deeper in a tele turn without fully compressing the springs. That’s the good news. Pierre Mouyade admits this changes the perceived flex resistance of the binding. So whether that is bad news or not depends on how much tele-resistance you like, and how noticeable that is is yet to be determined.
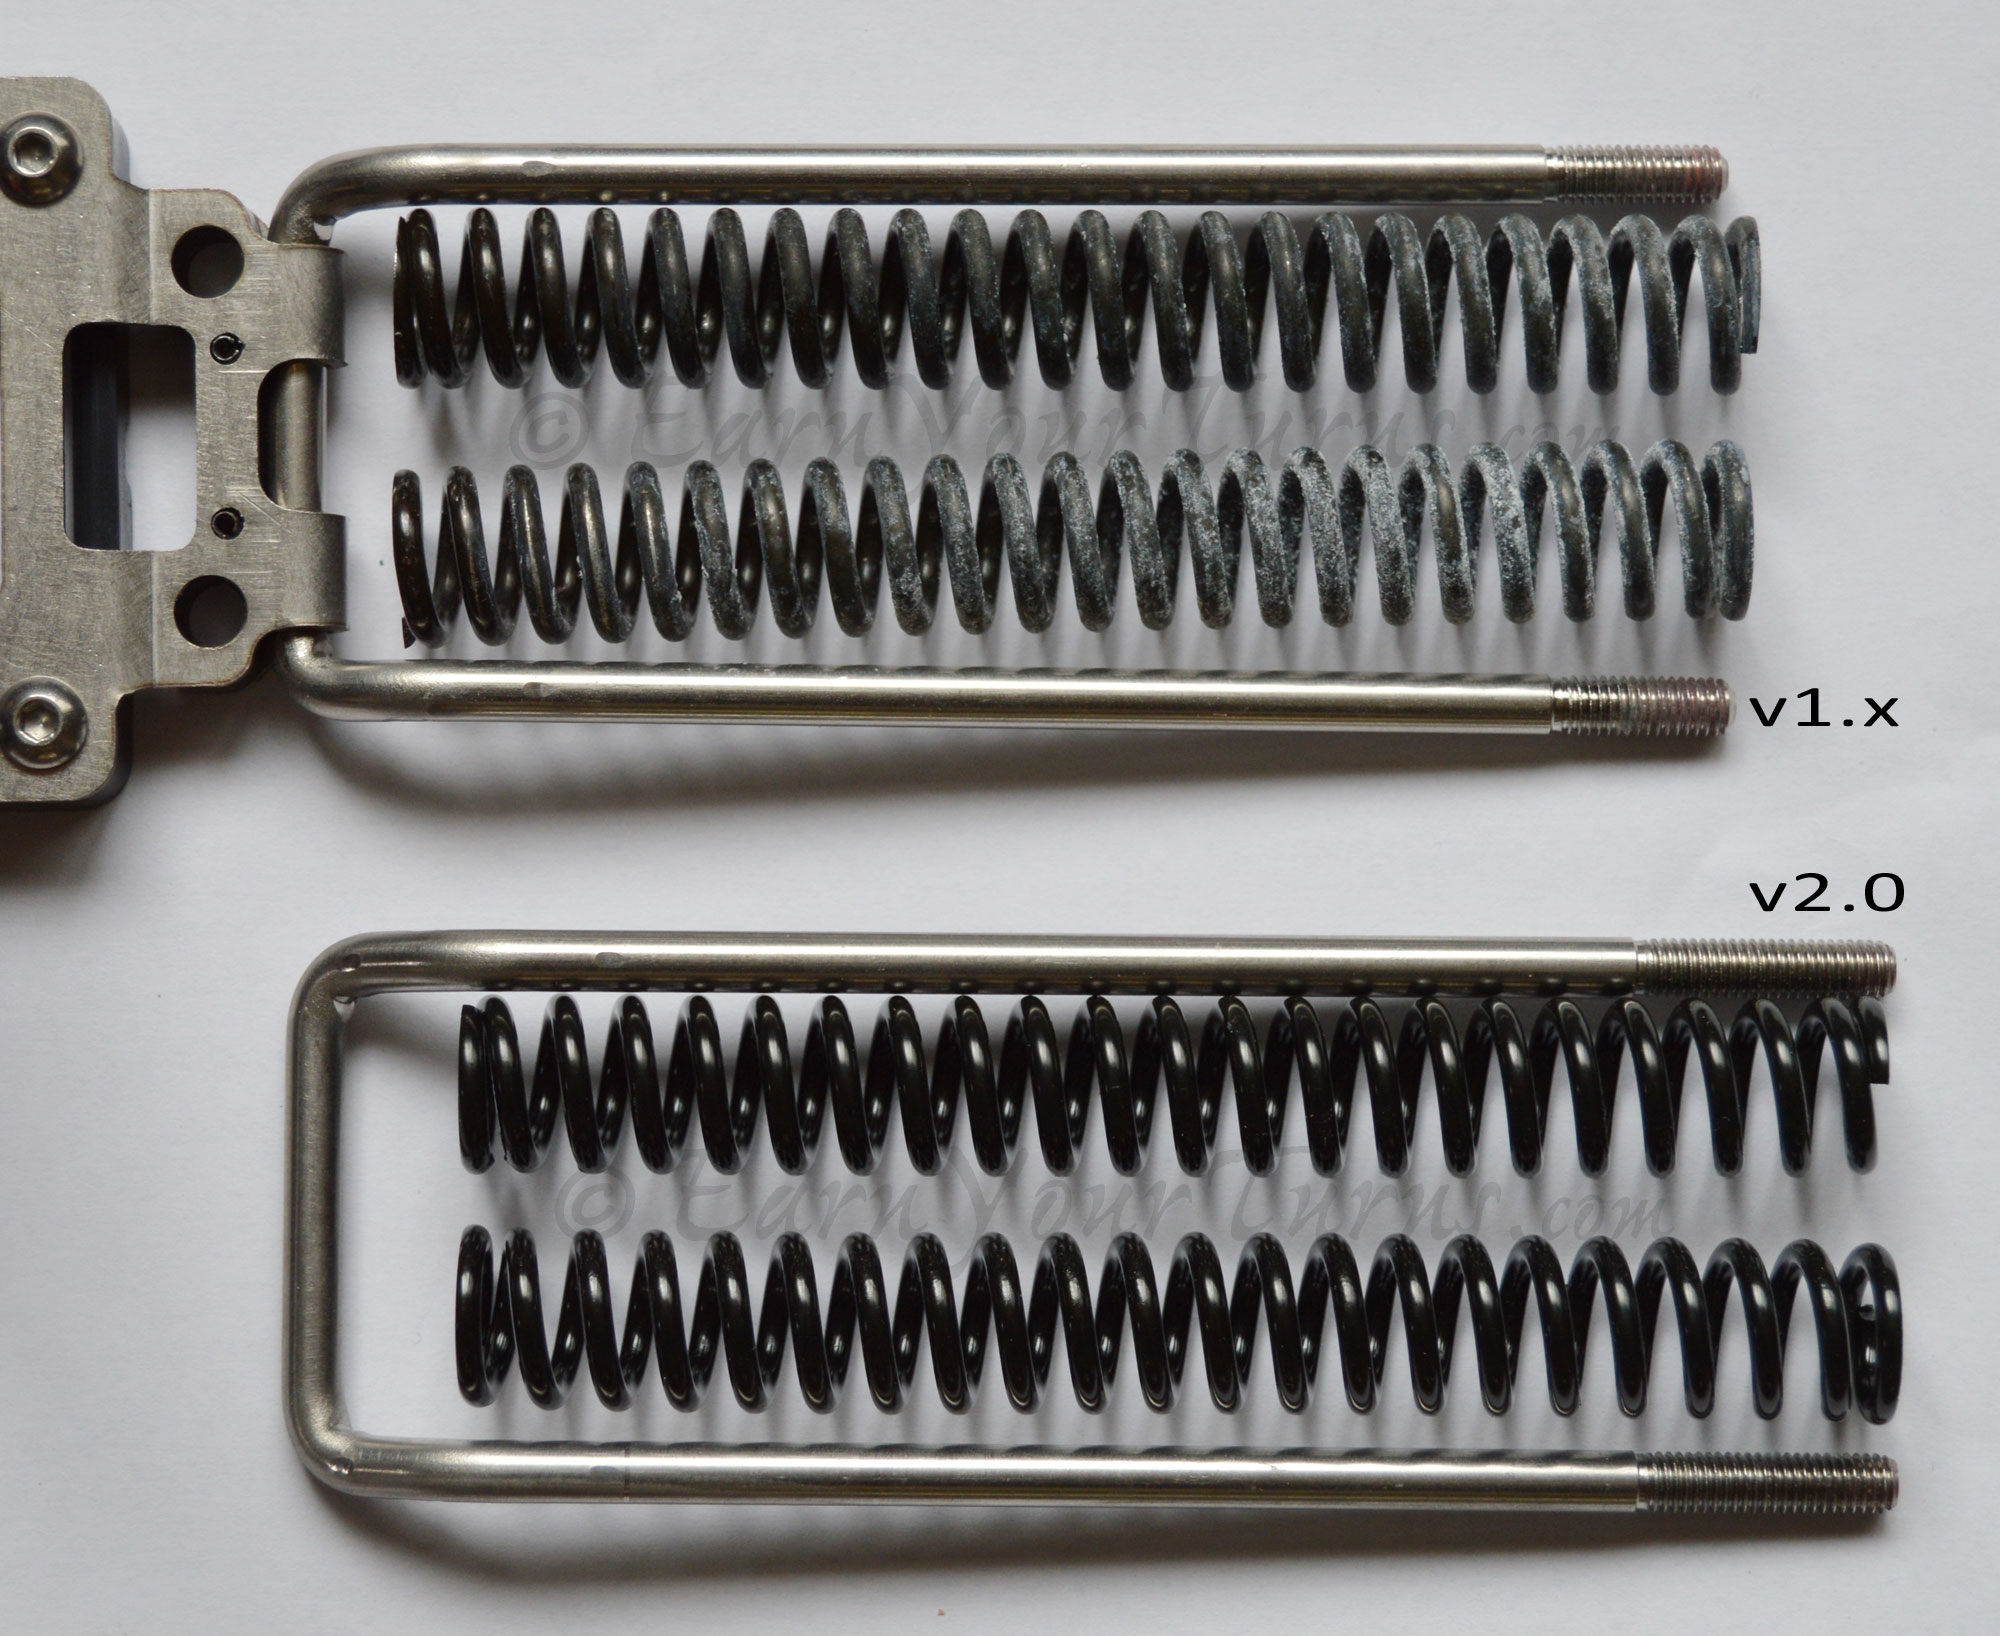
Spring travel increases for deeper teles without reaching full spring compression.
As with the upgrades experienced from ver. 1.0 to 1.2, nearly all the changes with ver. 2.0 sound like solid improvements. The only reason for saying nearly instead of all is the change in the effective spring pivot location which is bound to affect the “activity” of this binding. How much remains to be experienced, and since this binding doesn’t provide resistance to lifting your heel at the heel, but at the second heel, or the midsection of the boot, the change may be less noticeable.
With the Euro approaching parity with the Yankee dollar, a price of €550 for a complete package is sounding less far fetched than it did a year ago. You can spend less, but then you’d be missing all the options telemarkers have dreamed of for decades — step-in convenience, safety release, ski brakes, crampons, adequate power (admittedly not power to spare), lightweight and efficient touring in one package. You didn’t think an order that tall would be cheap did you? You could get a tech binding for the same or less, but they don’t tele for squat. 😉
The M-Equipment
Meidjo
MSRP: €450
Weight/binding: 500 g – 1 lb., 2 oz. (w/brakes)
Sizes available: Small (22-26), Large ≥ 26.5
Ski Brakes: € 49 (85, 95, 105, 115, 125 mm)
Requires NTN boots with Tech inserts. Genuine Dynafit inserts recommended.
© 2015
Related Posts
Rene Martin-Trudel’s 8 reasons I switched to Meidjo
Shoot Out at Mammoth: Outlaw VS Meidjo
26 comments
Skip to comment form
Now all we need is some good lightweight NTN boots with tech inserts
My project for this winter is adding an NTN underfoot duckbill to a pair of Scarpa F1 and use them together with this binding 🙂
Around these parts we call that the duckbutt. Which makes the NTN hook a butt hook. 😉
That’s the word I was looking for 🙂
Awesome review as usual. Can’t wait to try the step-in with brake. I was impressed how fast I got used to the step-in in ver. 1.2. At first, it wasn’t natural but after a couple of days, I got pretty good and I could step-in without fiddling. The addition of the brake is going to be great while I patrol.
hi Dostie,
i got lost in counting the amount of screws between the updates. Just ordered the 2.0 binding Large, but want to order quiverkillers parallel. I count 10pcs in the picture above. But that’s excluding heel risers if I’m right. Can you confirm total per foot?
Thanks a lot in advance!
Indeed, Meidjo demands a lot of holes. 13. Ouch. Makes it less likely to be swapped. I recommend the rear four holes have inserts for a stronger mount. All if you’re swapping bindings between skis. A pain to set up, but once done, will help justify the cost of the pair.
Which NTN boots have genuine Dynafit inserts? What might happen if you use a boot that does not have Dynafit inserts?
The NTN list is short. Scarpa uses genunie Dynafit, Crispi uses Crispi, and Scott plans to use Dynafit next season. All the dirty details on tech inserts are here: https://www.earnyourturns.com/32833/inserts-weak-link-of-the-2-pin-tech-system/
Dostie, sure nothing changed on the position of the small tour hook? Just drilled and mounted my Large v2.0 according template version A 14-oct-2015 and the tour hook is about 12-15mm to far rearward of the red plastic hook it should grab. Can’t see what I did wrong in assembly. Looks almost like mounting the touring base plate on the Small setting would be the fix. Have you heard of this before?
There may be a difference in the location of the hook for the large. For my smalls all I did was drill a few new holes in the toe, and swap the overall toe assembly. The red “stub” needs to first be fitted to the bumper as if you’re about to step in to the binding, but then you must push the spring box down and the red stub should be held far enough aft for the touring hook to hold on to it. If the forward end of the stub is not resting against the bumper then it will spring forward and the hook can’t grab it. That’s how it is when latched to your boot. I’m guessing that is the problem here.
Super. I overlooked that part. No redrilling needed. Yes the touring base plate got a different position (more to the rear) than the small. Indeed, I was pushing the “springbox” down in skiing mode. Not in “stepping in mode”. So the “springbox” didn’t moved rearward (making the metal bars visible). Super! Stress is gone now 😉
Can you add anything about using a model with brakes? And how do they work in touring mode? Does the toe-piece effectively lock the brakes up when it is clamped shut on the boot or is it just held up by the pressure of the boot’s sole? Thanks
Brakes on the new gen of NTN bindings are less than exemplary. Brakes on the Meidjo make it harder to get in to, and are susceptible to being hooked by the opposite ski when touring, which causes the brake to bend out, making it more likely to get hooked (and bent further) again. So while I like the idea of ski brakes, I’m not impressed with their reality.
Have you done this mod to your F1’s? If so could you share your details on this? I also have F1’s that I’ve been skiing with the TTS and I’ve just bought the Meidjo 2.0 so this mod is one I’m considering doing.
I love the TX pro and F1 boot combo for me. I use the NTN in area, TTS for BC. The Meidjo will switch hit in that respect so I’d ideally like to be able to use the F1 and TX Pro in all three bindings.
Not yet unfortunately – waiting for a pair of bindings to arrive for testing. I will mould a duckbutt out of carbon fibre and attach it under the boot with glue and or rivets/skrews if i find i nessesary. I will probably also add some reinforcement on the oppisite side inside the boot sinve the plastic in the f1 is pretty thin… Also thinking i might go with tts instead but then i would have to make a new heel lever to work with the f1 – how have you solved the issue of the f1 walk mode lever interfering with the binding heel lever?
The OMG TTS heel lever works very well with the F1. There is just enough camming action to snap it shut. I’ve been thinking about machining the duckbutt out of black delrin and attaching it to the F1 with stainless steel NF machine screws embedding flat t-nuts inside of the F1 shell sole. I am a bit concerned about adding the duckbutt to the F1 as i don’t want to screw them up, seeing as how we can’t buy them any longer. I sure do with Scarpa would make a new NTN/ Tech version of the F1 with the same light weight and buckle system. They are just so damn simple and an efficient BC boot
I moved my pivot point of the TTS Voille heel up from 64mm to 55mm this year which happens to mirror what the Meidjo v2.0 (56mm) is. The binding skis much better for me and my 26 shell as it’s a little less active for my small shell size. I think it’s very important to factor in shell size to pivot point on these new tech bindings so as to create the right resistance to help flex the boot smoothly. I love touring in my F1’s and they are plenty powerful enough to turn my Charger’s and Busters, as well as my new Zero G95’s once I have bindings mounted on them. I’m waiting for the Meidjo before I do any drilling in the Zero G95’s as i would like to install binding freedom inserts for both the TTS and Meidjo in this ski (just in case i chicken out on the F1 duckbutt mod.
I’m at the same crossroad – hesitant to start drilling in the f1.
I have the same size boot and I might go with TTS this year instead since I time usually runs out to do all the projects I want to.
Good to know that the heel lever works with the f1 and that you like how it skis.
I also planned using T nuts but I would add some layers of carbon inside the boot to use as a washer to distribute the loads – doesn’t have to be glued to the boot. The problem I see with using delrin for the duckbutt is to get a perfect fit to the sole of the boot. Moulding something would make that alot easier.
I agree the molding of the DB would ease the fit to the boot. Looking at the F1 sole the contour of the bottom is a single plane curved ramp and not a compound curve, so I’m sure I could get and accurate fit with a contour gauge and my small drum sander. I would scuff the bottom of the Pebax and use some Locktite 380 black max adhesive to set them and 2 SS NF bolts and T-nuts for the mechanical fastening. I think I will carefully peel the Vibram out-sole back and re-glue it to the Delrin DB to hopefully get and OEM look. I like your idea of the carbon layer inside the boot. It is kind of an ambitious project but if it works it will be SICK!
If I can pull this off then I would forgo drilling the skis for the Meidjo and the TTS as I did not realize the Meidjo had 13 holes (yikes) until I reading Craig’s comment on that. The TTS has 11 holes (these are including the heels). The Bizzard Zero G95 is a Palownia core with carbon so I’m planning BF inserts at all points to aid swapping the Meidjo to my Busters. My Chargers are the BC version so I’ll leave them dedicated to the TTS as they’ll rarely if ever see a ski area.
A non-compound shape definately makes the delrin doable! Havn’t looked at it that close i guess. I’ve also thought that beeing able to loosen the sole and overlap it would be great. Especially for durability when hiking – i have always been a little suspicious about how the duckbutt of ntn boots would hold up after some approach scrambling… Would be great to hear if you had any ideas on how to loosen the sole!
My guess is they used a urethane type of glue to bond the outsole to the shell. So after I made a cut I was thinking of using my heat gun, then solvent if needed to peel it back. The black max rubberized cyanoacrylate glue I think would work well as the bond for the outsole and the duck butt to boot, backed up with machine screws and t-nuts. I used this same glue to attach the stainless steel clips on the clip skins, when I was helping Kaj Gyr with his clip skins project. The stuff is amazing when you need a strong but flexible bond. Still nervous about the whole project though.
Okay- just put in a solid week of touring on the v1.2 Meidjo. In general things were great, but I did find that the climbing heels are pretty flimsy, prone to collapsing, and the pin holding the red hill lift works out of the base plate whether I have the heel up or not (basically non-useable). Also, I did manage through some poor boot insert behaviours to break one of the swivel arms on the red locking bar under the binding. Neither of these affected the skiing behavior of the binding, but made my backcountry experience a bit more fraught since I was in a remote location with no access to parts and I was spending much quality time on the up track. I think these are teething pains on what seems to be a really good design… I also noticed a lot of icing issues, particularly on the second heel (duckbutt) part of the binding- this regularly got packed up with ice and snow after a long ascent in tour mode, and I had to hack at it with my pole tip to get the ice removed pretty much every transition. Other than those issues, I really enjoyed skiing the binding (and more importantly, hauling them up the hill while my ski buddies slogged on with their G3 Ascents).
Hi! Are you using the f1 carbon cuff on the TX pro lower boot?
I have modified my F1 Carbon to go with my moonlight telerandos. New liner, full tilt tongue, booster strap etc. The cuff is more than stiff enough, but the lower part of the boot lacks torsional rigidity. I drive 107mm waist skis.
I am considering on using the cuff from the F1 boot on either a pair of F3s or on my old TX Pros. Any advices here?
Can someone please explain the tour-to-ski transition. With my Switchbacks and Rota Freedoms I’m used to ripping skins with skis on, flip a lever, start skiing. I have looked at a bunch of videos and haven’t seen this common situation depicted. Thanks.
Craig, I purchased V2 to replace V1 on my g3 zenoxides C3 believing they would fit in the same pattern of inserts. I AS MISINFORMED. and I had intended to move the V1 to my madshu annums permanently as I was sick of the length of time it took to transfer them from one set of skis to another after a amorning on the chairs before a bit of touring in the afternoon. The V2 are on my BD AMPs so need to buy and install another set of insets to fit the v2 to the g3s ( ie my preferred on and off piste ski ever.
I routinely switch from tour-to-ski without removing my skis. A couple things to consider. First, BEFORE you unclip the wire hook holding the spring box down you need to clean out the snow that has inevitably filled the cavity formed by the NTN hook/claw. If that is not loose, but has iced up you may need to step out of the ski to clean it. Most times I can “carefully” flick the loose snow out that has collected there with my ski pole tip. Then I depress the wire hook and then step down so the claw grabs the duckbutt. It all depends on the snow you’re touring in. Cold and dry yields little trouble – warm and sticky is almost always an issue.